GeckoWiper
User Manual
Select Your Language

Document Title: GeckoWiper User Manual
Revision: revQ
Revision Date: 08.April 2026
Prepared By (Company): Tigs Design & Engineering GmbH
Document Status: Released
Table of Content
1. Introduction
Congratulations on your purchase of GeckoWiper , available via https://www.geckowiper.com, the state-of-the-art attachable Rear Windscreen Wiper with dual mounting via Vacuum Pad and Magnetic System! This patent pending, innovative product is designed to provide efficient and reliable cleaning for your car's rear window while being tool-free to mount. Please read this user manual carefully to ensure proper installation, maintenance, and usage.
2. Compatibility
The rear window wiper system was successfully qualified for the following application.
Attention:
-
Use on vehicles and applications not listed in Table 1 below is prohibited, as safety cannot be guaranteed due to the lack of application-specific qualification.
-
For other applications, please check qualification regularly via https://www.geckowiper.com or give a direct request for your car/application via https://www.geckowiper.com/de/compatibility
Below List of approved GeckoWiper applications with videos
Hyundai Ioniq 5 (2019- 2024)

Wiper Mounting Position
Bottom mounted

Remote Mounting Position
Magnetic @speaker

Intro Video
QR code or LINK
Toyota bz4x & Subaru Solterra

Wiper Mounting Position
Bottom mounted

Remote Mounting Position
Hook & Loop (Velcro)
Intro Video
QR code or LINK
Kia EV6

Wiper Mounting Position
Bottom mounted

Remote Mounting Position
Hook & Loop (Velcro)

Intro Video
QR code or LINK
Tesla Y

Wiper Mounting Position
Top mounted, wind flag style

Remote Mounting Position
Hook & Loop (Velcro)

Intro Video
QR code or LINK
Tesla S

Wiper Mounting Position
Bottom or top mounted
Remote Mounting Position
Hook & Loop (Velcro)

Intro Video
QR code or LINK
Polestar 2

Wiper Mounting Position
Top mounted, wind flag style

Remote Mounting Position
Hook & Loop (Velcro)

Intro Video
QR code or LINK
Genesis GV60

Wiper Mounting Position
Top mounted, wind flag style

Remote Mounting Position
Hook & Loop (Velcro)
Intro Video
QR code or LINK
Hyundai Ioniq 6

Wiper Mounting Position
Top mounted, wind flag style
Remote Mounting Position
Magnetic @speaker

Intro Video
QR code or LINK
3. Package Content
The GeckoWiper Rear Windscreen Wiper Unit comes as illustrated with
1.) Geckowiper housing,
2.) Vacuum pump plunger indicator,
3.) Wiper arm,
4.) Wiper blade,
5.) Vacuum pad,
6.) Remote transmitter,
7.) Safety magnet
8.) USB-C charging port with waterproofing cover & LED charge indicator
9.) This current user manual, provided as QR-code link


Figure 1: GeckoWiper key components, 1.) Geckowiper housing, 2.) Vacuum pump plunger indicator, 3.) Wiper arm, 4.) Wiper blade, 5.) Vacuum pad, 6.) Remote transmitter, 7.) Safety magnet, 8.) USB-C charging port with silicone waterproofing cover
4. Installation Steps
The GeckoWiper installation is exemplary shown for Hyundai Ioniq 5 and shall be representative for all other qualified applications / cars of chapter 2.) Compatibility


Step-3
Clean & Moisten Window

Cleaning the Rear Glass Window:
-
Wipe the rear glass window with a damp towel to remove any contaminants from the area where the vacuum pad will be placed.
Attention:
-
For optimal suction, ensure the glass window is made wet before applying the vacuum pad.

Moisten Window
-
After cleaning, lightly spray the window with water before mounting GeckoWiper.
-
This step is important as vacuum force is increased and better sealed.
Step-4
Clean & Moisten Pad

Clean vacuum pad
-
Rinse the vacuum pad surface thoroughly with water to clean it.
Moisten vacuum pad
-
For installation, make vacuum pad wet with water, as vacuum pad surface provides even better adhesion than a dry one.
Step-5
Rear Wiper Installation

Position Housing
-
Position the wiper system as shown, pressing the housing firmly against the window. Ensure the vacuum pad fully contacts the glass and the blade clears the top spoiler.
-
Place the rear wiper with the pump cylinder facing downward and the blade upright.
-
Press firmly, then pump until the orange indicator disappears, confirming a secure vacuum hold.

Vacuum pump
-
If the vacuum level is insufficient, the orange vacuum pump plunger will become visible. Please check and re-secure as needed.
Step-6
Collision Check

Rotate wiper manually
-
Manually rotate the wiper arm ±90° from its vertical position to check for any collisions between the wiper blade and the vehicle spoiler.

Check car body collision
-
Check by hand motion +-90deg against collision with spoiler
Step-7
Mount Counter Magnet

Magnet Handle Placement & sliding:
-
Open the trunk and place the magnet handle on the rear window surface at a distance of more than 20 cm.
-
Slowly slide the magnet toward the center of the GeckoWiper® unit until it is attracted.
Attention:
-
Never move the magnet directly behind the GeckoWiper® housing in an axial direction.
-
Always slide it tangentially from a distance toward the housing to avoid strong axial pull, which could pose a shock risk to the window.

This ensures dual safety through both vacuum and magnetic mounting.
-
The safety magnet is mounted on the backside (inside) of the car's rear window.
Step-8
Mount Remote Key

Transmitter magnetic fixation
-
The remote transmitter key features an internal magnet, enabling it to attach to the load speaker of the Hyundai Ioniq 5.
-
For other vehicles (KIA EV6, TESLA Y,...) and applications, Velcro hook-and-loop tape is provided, preferable for remote attachment on hard plastic surfaces.

Fixation Hook-Loop Tape
-
For cars which are NOT Hyundai Ioniq 5 /6, remote key fixation is designed with Velcro on any hard plastic surface,
-
exemplary Kia EV6 Cockpit
Step-9
Start Wipe Motion

Start wiping
-
To start wiping, press the remote transmitter key for more than 2 seconds. This delay is necessary due to the battery's deep-sleep design, which helps extend the wiper's internal battery life during standby.
-
After two wiping cycles, the motion will stop, and the system will enter sleep mode again.
-
Reactivation is possible after a brief delay of 1-3 seconds.

Key press > 2 secounds
-
Remote transmitter key press with RED light confirmation pressing by > 2sec for wipe activation
5. Dismounting
The GeckoWiper dismounting is exemplary shown for Hyundai Ioniq 5 and is identical for all other cars used with GeckoWiper.

Step-3
Slide away internal magnet
Slide away magnet
-
Once the trunk is open, slide the internal safety magnet horizontally away from the housing.
-
Attention: Do not attempt to pull the magnet away axially, as it is very strong. Always remove the magnet by sliding it away

Slide only
-
Slide the trunk's internal safety magnet away sideways from the GeckoWiper housing.
Step-4
Open Vacuum

Open Vacuum
-
Lift the vacuum pad's rubber handles to break the vacuum by vertically lifting one side of the pad.
-
The GeckoWiper unit can now be easily removed from the window.

Pull up vacuum pad handle
-
Open vacuum system by rubber handles pull-up motion
Step-5
Assembly Safety Magnet

Join magnet and pad
-
The safety magnet is very strong and should be securely attached to the inner surface of the vacuum pad for storage. This minimizes external magnetic field attraction, ensuring safe storage.
-
Attention: When placing the magnet on the vacuum pad, approach it with a rolling motion, not axially, to reduce the speed of attraction. Be cautious to avoid pinching your fingers.

Safe storage
-
For safe storage, attach the safety magnet to the inner surface of the vacuum pad.
6. Handling Safety Magnets
GeckoWiper comes with a pair of strong Neodymium Magnets. They are technical required and designed to work well & safe for the mounting intend with a car window. During handling, mounting and dismounting, specific care has to be given, see safety recommendations below.

The 1st magnet is placed behind the rubbery vacuum pad. A safety label on the vacuum pad surface also indicates this.

The 2nd magnet is placed below the rubber billow in the countermagnet handle
Attention !
Risk of Injury-Powerful Magnets


HANDLING Risk:
-
GeckoWiper magnets produce extremely strong attractive forces and may snap together unexpectedly, even from a distance.
-
Always maintain a minimum distance of 50 cm between magnetic parts (vacuum pad & countermagnet) during handling.
Pinch Hazard
-
Keep fingers, skin, and other body parts away from the space between magnets, or between a magnet and any metal surface.
-
Pinching injuries can occur due to the strong magnetic attraction.
-
Avoid handling magnets near metal objects or surfaces.
General Handling Precautions
-
Never allow magnets to collide freely with each other or metal tools—
-
both GeckoWiper magnets are enclosed in rubber, but forces remain still strong to generate danger
-
Keep away from pacemakers or implanted medical devices—magnets can interfere with their function.
-
Keep a safe distance from electronic devices, credit cards, and data storage media—magnetic fields can cause permanent damage.
Not a Toy
-
Not suitable for children.
-
Store GeckoWiper out of reach of children and pets.
7. Road Safety
-
Pressing the vacuum pump plunger creates a steady vacuum in the vacuum pad. The orange vacuum level indicator will disappear once the maximum vacuum is reached. Before use, ensure the orange vacuum indicator is NOT visible. If the GeckoWiper® remains mounted, check the indicator before driving to confirm it is not visible. If the vacuum pad was correctly attached, the orange indicator will remain fully absent during a 12 hour period, indicating a stable vacuum capable of lasting much longer (months).

-
Only activate the wiping motion using the remote transmitter key when the system is securely attached to the rear window. Do not start the wiper while holding it in your hand!
-
ATTENTION: Operate the GeckoWiper® only when both the vacuum and safety magnet are properly attached. Using the vacuum pad alone, without the safety magnet, is prohibited.
-
For added safety, it is recommended to perform an initial test wipe with the remote key before starting any journey to confirm the GeckoWiper® is working properly.
-
Do not operate the wiper without sufficient vacuum, as indicated by the orange vacuum plunger indicator.
-
Keep the vacuum pad clean to ensure optimal performance.
-
Always keep the safety magnet mounted behind the window.
-
Use the product in compliance with local traffic regulations.
-
For best results, remove the wiper unit in car wash facilities and verify its attachment afterward.
8. USB-C Recharging
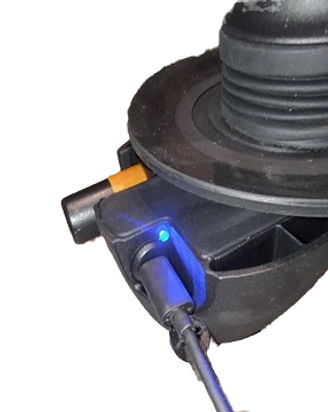
The GeckoWiper is equipped with a USB-C charging port, compatible for USBC chargers typical used for phones. When charging correctly, the blue LED indicator will light up once the USB-C charger is connected & will switch off after the battery is fully charged (roughly after 6 hours charging).
If the GeckoWiper® system shows slowed wiping motions & stops working at all, it may need recharging. Use the built-in, waterproof USB-C charging port to recharge the device.
-
Charging time is approximately 6 hours for a full charge, overnight charging recommended.
-
Connect the USB-C charging cable to a suitable power source, such as a car's internal USB charger, a phone charger, or a power bank (see Table 3).
-
Using a power bank allows you to even charge the GeckoWiper® while it remains attached to the rear window.
-
The blue LED light will remain steady while charging and will turn off once the battery is fully charged.
9. Maintenance
Before each drive, check
Vacuum Indicator:
-
The orange pump vacuum indicator should not be visible, indicating the vacuum is available.
-
If the orange indicator is visible, the vacuum level has dropped, and repumping is needed or re-cleaning needed.
Window Cleaning:
-
Spray the rear window with water to clean it before each new attachment.
Vacuum Pad Cleaning and Inspection:
-
Ensure the vacuum pad is cleaned and free from damage before mounting.
Magnet Installation:
-
Verify that the magnet behind the window is correctly installed and in good visual condition.
Magnet Handling:
-
Always remove or attach the magnet using a horizontal sliding motion.
-
Do not move the magnet axially toward or away from the GeckoWiper® housing to avoid creating a shock on the rear window.
10.Quick Help & Solutions
The following quick help steps shall be used to find quickly solutions. Please feel free to reach out directly to us via CONTACT FORM. We are always happy to help.
🔧 ID 1 - Activation
Situation
-
Wiper does not start when remote transmitter key pressed
Reason
-
Key press <2sec
-
GeckoWiper Battery empty
-
Remote Key Battery empty
Solution
-
Press the key continuously for more than 2 seconds to activate the wiper. The system enters sleep mode to conserve energy, and the >2-second key press is required for reactivation.
-
Recharge battery via USB-C port
-
Replace coin batteries, 2x CR2016 in remote key (typical after 2-years). Ensure to keep magnet on top of CR2016 battery
🔧 ID 2 - Vacuum Pad
Situation
-
Slow leakage of vacuum pad
Reason
-
Dry mounting surface of vacuum pad
-
Damages on vacuum pad sealing surface
-
Debris in pump
-
Dirty or uneven window surface
Solution
-
Clean the window and pad with a damp towel to remove any particles. Reapply the pad to the pre-wetted rear window for optimal suction performance.
-
Replace vacuum pad, contact us
-
Clean pump plunger
-
Clean the window and pad with a damp towel or rinse with water to remove any particles. Reapply the pad to the wet rear window for optimal suction performance.
🔧 ID 3 - Vacuum Pad
Situation
-
Quick leakage of vacuum
Reason
-
Damaged vacuum pad surface
-
Damaged pump
-
Dirty or uneven window surface
Solution
-
Replace vacuum pad, contact us
-
Replace pump, contact us
-
Clean the window and pad with a damp towel or rinse with water to remove any particles. Reapply the pad to the wet rear window for optimal suction performance.
🔧 ID 4 - Vacuum Pump
Situation
-
Stuck Pump
Reason
-
Vacuum still available
-
Debris in pump
Solution
-
Release the vacuum by pressing the two pad ears at the 10 o'clock and 2 o'clock positions. This will allow air to enter, causing the plunger to move outward.
-
Clean pump internal parts
🔧 ID 5 - Wiper Start Position
Situation
-
Wiper not at intended start position
Reason
-
Wiper not at intended start position
Solution
-
Press remote key >2sec, wiper arm will auto realign
🔧 ID 6 - Wiper Blade Replacement
Situation
-
Wiper blade worn
Reason
-
Long time usage or damage by ice/ removal

🔧 ID 7 - Wiper Arm Spring Remounting
Situation
-
Insufficient wiper blade pressing force onto window
Reason
-
Wiper arm spring dismounted
Solution
-
Dismount GeckoWiper from car
-
Follow Step-1 & 2 below


1.) Dismount of wiper arm spring (VIDEO LINK)
2.) Remount of Wiper arm spring (VIDEO LINK)
11.Technical Specifications
GeckoWiper® , an add-on removable rear window wiper
-
Remote key activated >10m
-
Battery powered
-
Dual vacuum and magnet fixation
-
Quick mount in 10sec
-
Patent pending design
-
Standby: 6-months+
-
Compact Design
-
Low Energy Design
-
Tool-free mounting & dismount
-
Wipe angle +-90deg
-
USB-C charging, also possible while mounted on window
-
Vacuum Indicator: Orange pump vacuum indicator
-
Mass: 1kg
-
Qualified car usage worldwide
12. Returns & Warranty
13. General Terms & Conditions
See LINK
14. Impressum
Company: Tigs Design & Engineering GmbH
Email contact: GeckoWiper@gmail.com
Website: https://www.geckowiper.com